A few years ago I wrote about the inspection levels, but I regularly notice that some people are confused about the “special” levels (S1, S2, S3, and S4).
Here is what the ISO 2859-1 standard says (emphasis is mine):
The inspection level designates the relative amount of inspection. Three inspection levels, I, II and III, are given in Table 1 for general use. Unless otherwise specified, level II shall be used. Level I may be used when less discrimination is needed or level III when greater discrimination is required. Four additional special levels, S-1, S-2, S-3 and S-4 are also given in Table 1 and may be used where relatively small sample sizes are necessary and larger sampling risks can be tolerated.
Continue reading, or watch the video below for a quick summary of this blog post.
Get the slideshow: You can download this slideshow to read in your own time here.
When to use special inspection levels?
The above excerpt from the standard is pretty clear. There are 2 good reasons:
a) The general levels (I, II, III) point to a number of samples that is not realistic
Here are a few examples where these special levels come in handy:
- You want to check the packaging in full, but only on a few cartons.
- You want to perform some time-consuming tests (e.g. a full function test on an electrical product), and you don’t have time to run these tests on all the samples you inspect visually (in level II, usually).
- You want to perform destructive tests (e.g. inspecting bullets by firing them), and obviously you don’t want to destroy too many samples.
b) Checking much fewer samples doesn’t mean the risk of non-detection is much lower
Let’s take a simple example. The casing of an electronic product is made by plastic injection molding.
All of those pieces come out of the same mold. The most important is to validate that the first articles are acceptable and sign off on them. There is still a chance that things go downhill over time, but dimensions will tend to be similar, and many buyers decide to reduce the sampling size on all pieces coming out of a mold. That tradeoff makes sense.
How to read the AQL tables when using special inspection levels?
I prepared this simple ‘whiteboard’ video to explain how it works:
Let’s walk through an example.
Let’s say you are buying 50,000 salt & pepper sets in ceramic.
There are several color combinations, some booklets are included, etc. which means many ways the packing can go wrong. So you want to check the packing in great detail, but only on an S3 level.
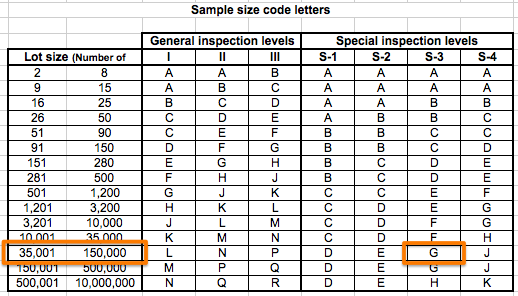
In the table below, you see that the code letter is G.
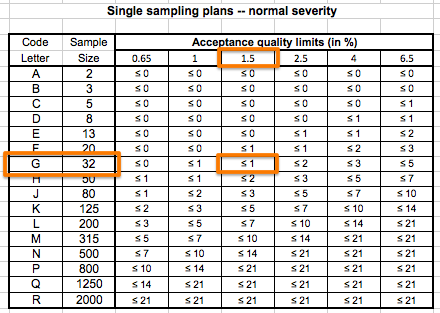
Then let’s go to the other table, and you can find this information:
- You should check the packing on 32 samples.
- If you don’t want to accept a defective packing on more than 1.5% of the quantity, the limit is 1.
- In other words, you accept the batch (as far as packing conformity is concerned) if you find 0 or 1 defective cartons. And you reject it if you find 2 or more.
Note that, when it comes to tests on products and these tests are conducted on a special level, they are considered “critical” (i.e. they are failed as soon as 1 sample fails).
It makes things more simple and avoids lengthy discussions with Chinese suppliers who don’t fully understand how the statistics work.
I hope this explanation was clear. Questions are welcome, so leave a comment in the comments section if you have one!
Three examples of points checked on different levels
Let’s say you are working on a batch of LED lights. Here are the three checks that may take place on different levels.
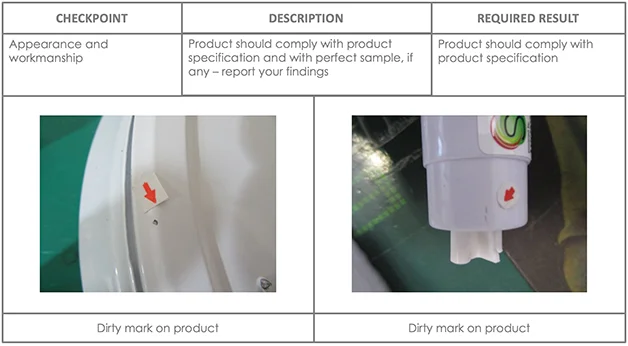
Visual check
A visual check would typically be done on a general level such as II.
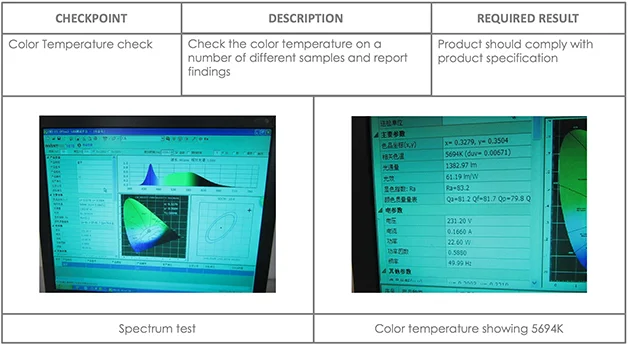
Color temperature test
A color temperature test, if very important, might get done on S-2.
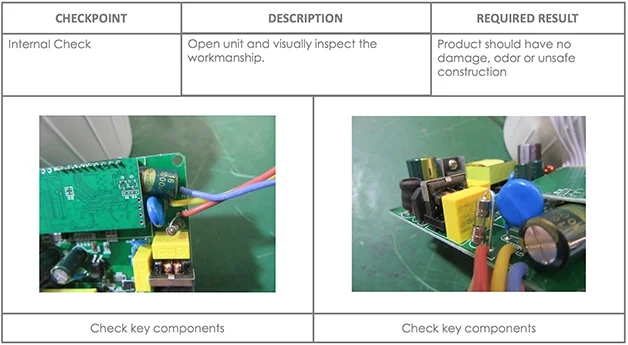
Internal check
An internal check is typically done on S-1, or just on 1 piece (irrespective of the whole batch quantity).
(For a more in-depth overview of the checkpoints that apply on LED products, you can watch this video: LED Products Quality Inspection & Testing Checklist .)
Editor’s note: This post was originally published in 2014, and has been updated with additional content in 2019.
Get expert help to improve YOUR product quality from suppliers in China or Vietnam. Read: Quality Assurance In China Or Vietnam For Beginners
Grab your free copy of Sofeast’s eBook and learn the common traps new importers from China or Vietnam fall into, and how to avoid or overcome them in order to get the best possible production results. It also outlines a proven quality assurance strategy that you can follow in order to have better control over your product quality, covering:
- Finding Suitable Suppliers
- Defining your Requirements before Production Starts
- Don’t Skip the New Product Introduction Process
- Regular Quality Inspections (Trust but Verify)
- Tying Payments to Quality Approvals
Sounds good? Hit the button below to get your copy now:



0 Responses
Hi ,can I check if this AQL TABLE is applicable for Canned food products? If yes, can I apply the special inspection level if destructive tests (i.e. to check the drained weight) are to be done on the samples? Thanks!
My responses are: yes and yes.
Hi Renaud, i,ve quick question for you, if i found 3 defect within 1 pcs, should i calculate all defect or i only need calculate 1 deffect (i take the worse defect)? Thanks.
Count only 1 defect (and categorize it as the worst defect).
So in acceptance quality limits table above actually it showing max acceptable pcs not max acceptable deffect right? if so do you have any article related to my question above. Many Thanks! 🙂
Right. Maximum acceptable number of defective products.
I suggest you read https://www.qualityinspection.org/what-is-the-aql/
Renaud, I am still having trouble answering what should be an easy question. Love the fact that I found this site!
Using Z1.4-2008/Mil-Std-105E…
Does the SAMPLE SIZE change(slide) with the AQL?
For example…
Single/Normal, Lot size 4000pcs, S-3, AQL=Critical 0.0, Major 1.0, Minor 4.0
Sample Size = 20, 13 or 32?
Why?
Also it would be great if you could direct me to the supporting doc.
Thanks!
The sampling size is 12 for major defects and 20 for minor defects. And, from my personal interpretation, you can check the 20 pieces also for critical defects.
The supporting document is the latest edition of the ISO 2859-1 standard.
Sorry, I just don’t understand. “12” isn’t even one of the Sample Size choices on the Table 1 from the standard, or from the table on your site, attached below. Thanks again.
Here is the exact table, straight out of the standard. It is more precise.
Renaud, please show me where the Sample Size of “12” is. I only see 8, 13, 20, etc.?
Sorry, I meant 13. I corrected my previous answer, too.
I have a standard I have been asked to test to, but I’m the tester after the fact, not the manufacturer.
The quantity is 1, but the standard requires a proof load test and destruction test. AQL sample sizes start with 2.
The standard sample size reads 2 to 8, proof 2 and destroy 2.
but what about when qty is 1?
if you have to test 1 piece, you don’t need to resort to sampling and worry about what sampling scheme to use! Just test that one piece and take a decision based on the result.