You conduct reliability tests on your new products. You and your suppliers do product inspections and laboratory tests on mass production orders. Your customers probably give you feedback on the issues they find on what you ship to them. You collect many data this way. You set aside samples that don’t pass. But do you learn from this?
One of the most important activities is the investigation of the causes of product failure when certain samples fail the inspections/tests or fail in the hands of users.
What are the steps in such an investigation into failed products?
I made a list of 7 logical steps when investigating the causes of product failure. MIL-STD 785b called this ‘FRACAS’ (Failure Reporting, Analysis, and Corrective Action Systems) and I am simply outlining that same general approach:
1. Obtain those samples
This should be a regular exercise, so make sure to define who should receive the samples that are not working, that broke too early, that caused safety incidents, and so on. Make sure to align sufficient resources (including technical competence and testing equipment) to do this well.
2. Document any information about the failure
The user might be able to describe when it failed, what seems to have led to the issue, what the temperature & humidity were, and so on. This is quite important, to help quality/reliability engineers proceed with their analysis.
Also, get the information needed to know what manufacturing batch the piece comes from. If it was just put on the market, it is more likely to be the result of poor manufacturing, for example.
3. First analysis
Put these samples in different categories, such as:
- Product is no longer functional (seemingly because of an electrical failure, mechanical failure, etc.)
- Product is still mostly functional but its capability is degraded
- Only an aesthetic/surface issue
- A known and common issue (which may be related to design defects or to manufacturing)
- No issue found — this may mean the user misreported the situation, but it can also come from the inability to reproduce the steps and the environmental conditions that led to the problem. That is not uncommon.
Document all this. Make sure to use this database to detect what types of problems are most frequent. That will be extremely useful.
4. Deeper analysis
What actually triggered the problem? Was there acute stress on a bearing, a current surge, or some other type of stress? What series of events unfolded?
Involving the design engineers who worked on this product development may be necessary. They might already have thought of this risk in their design FMEA. They might also have detected it on one of their prototypes. They might have all the information you need on their hands.
For example, the issue of phones that don’t power on may come from (1) a battery management system that lets batteries get down to 0% charge and (2) a long storage period before the product is charged and used. Some of the batteries don’t ‘survive’ such a situation.
5. Is there a need for immediate containment?
Maybe the product failure can cause a serious safety issue for users. The most urgent, in this case, is to alert all users of the same batch of products. If the initial cause of the issue is related to a design weakness, alert all users of the same version of the product. Where necessary, proceed with a recall. (Hopefully, you already have a contingency plan for this situation, and it is time to put it in practice.)
6. Planning for corrective action(s)
If the issue does not have severe effects and seldom appears, you may decide to devote your time to more important matters.
However, if there is a need to address this issue, you need to plan on how to do that. You already understand what triggered the issue. So, the question is ‘how to prevent this from happening again in the future?’
In the example of the batteries that went down to 0% charge for several months, a change to the battery management system may be a relatively simple and inexpensive action to prevent the same problem in the future. It may be sufficient, but having the ERP system show an alert in case of prolonged storage reduces the risk of recurrence even further.
In some cases, building new prototypes and testing them is necessary to confirm that the suggested improvements bring benefits.
7. Implementing corrective action(s) and following up
This is the logical sequence of the previous plan. Put the improvement in place. And follow up to ensure it does not trigger other issues that were not predicted.
Again, depending on a cost-benefit analysis, on limited resources and past commitments, and on a ranking of the most important actions to take, the company may de-prioritize this improvement initiative.
How do quality/reliability engineers test the failed samples and collect information?
There are many methods of failure analysis. It is easy to get confused and submerged by the number of options.
However, there is a basic logic to follow with just two approaches for investigating the causes of product failure to follow:
- Start with non-destructive techniques. Observe the product and its parts, including using a microscope. Put it in a chamber, change the temperature, and look for patterns. Conduct electrical tests, possibly with thermal imaging. Check for parts deformation. Check for marks indicative of heat, liquids, and so on. Certain methods such as X-ray or scanning acoustic microscope can reveal internal issues.
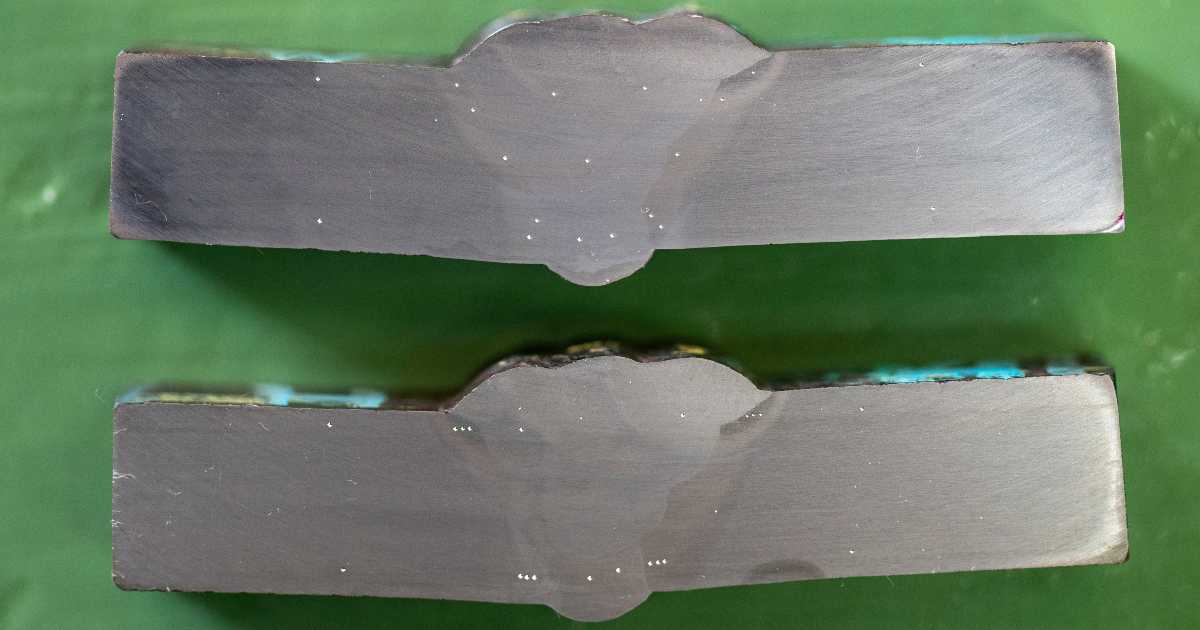
- Only after that initial approach, go with destructive techniques. Disassemble the parts, remove components and analyse them as well as their fixation (e.g. soldering). Cut some pieces and examine their cross-cutting visually (see an example of cross-cutting below):

Some of the necessary equipment may be expensive, but you can probably find a testing laboratory that can carry them out.
******
I don’t know of any company that makes products that always function as intended. Investigating the causes of product failure and using that information for driving design improvement is a healthy process.
Two weeks ago, I wrote about improving the durability of new products. Learning from problems is a major part of that exercise!
Ultimate Guide To Sourcing From China And Developing Your Suppliers [eBook]
This eBook starts from the beginning, discussing whether you need to hire a sourcing agent, and follows the sourcing process right through to developing a trusted supplier’s quality and productivity.
There are 15 chapters over 80+ pages to explore, providing exhaustive guidance on the entire sourcing and supplier development process from start to finish, including:
- Identifying suppliers,
- Negotiations,
- Quality inspections,
- Developing Chinese suppliers,
- Improving factory quality and productivity,
- and much more…
Hit the button to grab your copy now:


