Editor’s note: This post was originally published in April 2021, and has been updated with new content in April 2025.
You’ve placed an order, everything seems to be on track, and then the shipment arrives… only to find defects, wrong labels, or packaging that doesn’t meet your standards.
Now you’re dealing with delays, rework, and frustrated customers — and you’re wondering how it could’ve been avoided.
That’s where a quality inspection checklist comes in.
It helps ensure every item is reviewed against clear, consistent standards before it leaves the factory. It doesn’t matter if you’re running inspections in-house or working with a third-party — having the right checklist in place can make all the difference.
What is a Quality Inspection Checklist?
A quality inspection checklist is a structured document used during product inspections to ensure items meet defined requirements before they’re approved for shipment.
It outlines what should be checked, how it should be checked, and what standards the product must meet. This includes physical specifications, functionality, appearance, packaging, labeling, and any safety or regulatory criteria relevant to the product.
Why Is It Important?
A quality inspection checklist makes inspections consistent, objective, and aligned with expectations — especially when working with multiple suppliers or product types.
Without it, inspectors might miss critical issues or interpret quality standards differently. With it, you’re ensuring that:
- Only products that meet your requirements move forward
- Defects are identified early — before shipping or distribution
- Rework, returns, and customer complaints are reduced
- Teams across the supply chain are working from the same set of standards
It also strengthens supplier communication by clearly defining what “acceptable quality” looks like — no assumptions, no misunderstandings.
In industries with safety regulations or certifications, a checklist also supports compliance by documenting that the right checks were completed… and passed.
In short, it’s not just about ticking boxes — it’s about making sure what reaches the customer is exactly what was promised.
Quality Inspection Checklist Examples
Sometimes the best way to understand how to build your own checklist is to see how others have done it. Below are real examples of quality inspection checklists used across different product types.
Example for Soft Goods (3-Ply Face Masks)

This checklist covers inspection steps for disposable face masks — which are considered soft goods.
It includes detailed checkpoints for packaging, dimensions, nose clip functionality, ear loop strength, material quality, and even breathability tests.
It’s a great example of how to handle visual checks, functional testing, and regulatory compliance in products where safety and consistency are top priorities.
Example for Hard Goods (Protective Goggles)

Protective goggles fall under hard goods — meaning they have fixed shapes and require different inspection methods than fabric-based items.
This checklist dives into points like lens clarity, strap attachment, anti-fog testing, and durability. I
t’s also structured well for guiding inspectors through both aesthetic and performance checks, with a strong emphasis on user safety and comfort.
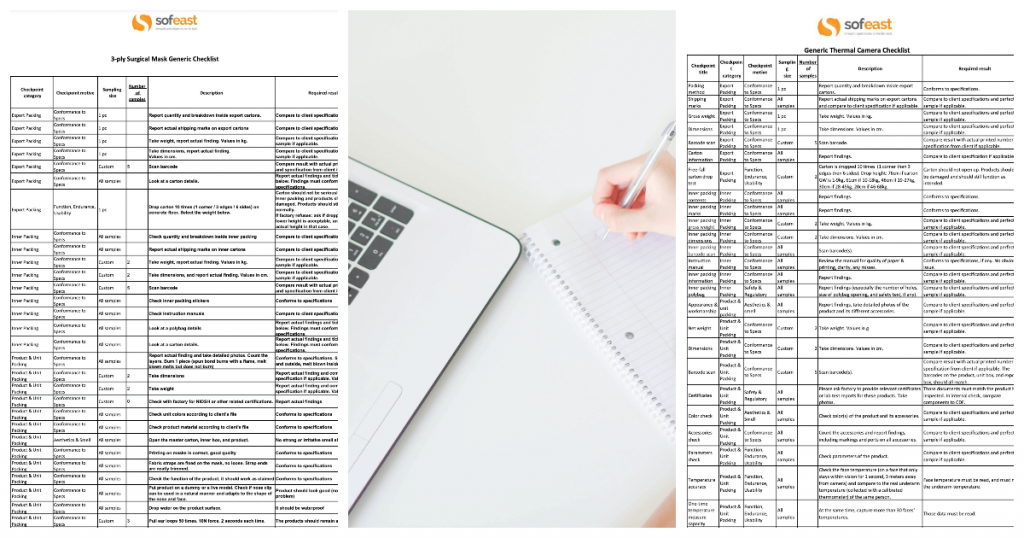
Example for Electronic Products (Thermal Camera)

Electronics require a layered inspection approach, and this thermal camera checklist is a solid example of that.
It includes steps for visual inspection, functional testing (like display quality, button feedback, and calibration), electrical safety checks, and accessory verification.
It’s especially useful for teams working with products that involve software, hardware, and safety requirements all at once.
How to Create an Effective Quality Inspection Checklist
If you’re in charge of product quality—in manufacturing, sourcing, or inspections—a well-structured checklist removes guesswork and keeps everyone aligned.
Here’s how you can build one that actually works in real-world scenarios.
1. Start by Structuring the Inspection Flow
Before diving into what to check, think about how the inspection itself will flow.
For most physical products, inspections happen in a logical order: starting with the outer packaging (like export cartons or pallets), moving on to inner packaging (such as polybags or inserts), and then finally, the product itself.
This step may sound basic, but it really helps guide the inspector step-by-step. It’s like unpacking a box in reverse — the checklist should mirror how the inspector will physically move through the items.
2. List the Must-Have Product Requirements
Next up, pull out the product specs or purchase order and highlight the essentials — things like dimensions, weight, materials, colors, barcodes, branding, and labeling.
These are non-negotiables. If the supplier messes these up, that’s a clear red flag.
You’re basically saying: “Here’s what we asked for… now let’s make sure it’s exactly what we’re getting.” Anything that’s been promised to the customer should be accounted for here.
3. Include Any Safety or Regulatory Standards
If your product needs to meet certain safety or compliance standards — like CE, FCC, FDA, or industry-specific certifications — make sure those checkpoints are clearly outlined. For example, if your product needs a specific warning label or can’t include certain materials, that needs to be a line item.
Don’t assume the inspector already knows this. It’s your job to point them directly to what matters, especially when regulations are on the line.
4. Define What “Good” Looks Like Visually
Visual and cosmetic checks are often the most subjective… unless you clearly define what to look for. This is where you include notes like: “Check for scratches longer than 2cm,” or “Logo print should be centered and not faded.”
The more you can spell it out, the better. If you have images of good vs. bad samples, even better. Trust us — it’ll save a lot of back-and-forth when people are trying to decide if something is a “minor” or “major” defect.
5. Don’t Skip the Functional or Performance Tests
If your product is supposed to do something — open, close, light up, zip, twist, charge, whatever — your checklist needs to test that. It might mean pressing buttons, zipping zippers, or turning knobs 10 times in a row to make sure nothing gets stuck.
Also consider: will these tests damage the product? If yes, how many samples are okay to test destructively? These details matter, especially for more expensive or fragile items.
6. Be Super Clear About Pass/Fail Criteria
This is where a lot of checklists fall flat — they leave too much room for interpretation. Every item in your checklist should answer two key questions: how will the inspector check it, and what exactly counts as a pass or fail?
For example: instead of saying “Check barcode,” say “Scan barcode with a handheld scanner — must match SKU code XYZ.” No room for confusion there. The more specific you can be, the more reliable your inspections will be.
7. Mention Sample Sizes and Equipment Needed
Some tests can be done quickly… others take time, or may destroy the product. That’s why your checklist should mention how many units to test per checkpoint. Maybe 10 units for visual checks is fine, but for a destructive drop test, maybe 2 units is enough.
Also — does the inspector need a barcode scanner, caliper, or voltage tester? Will the factory provide it, or should the inspector bring their own gear? These things might seem small until you’re stuck on-site with missing tools and no backup plan.
8. Test the Checklist (Then Improve It Over Time)
Before you consider the checklist done, test it. Run through it with your team or even do a mock inspection if you can. You’ll often catch things that felt clear in your head but are confusing in practice.
And remember… your checklist isn’t set in stone. You’ll learn as you go. Maybe a common defect keeps popping up and needs to be added. Or maybe something on the checklist turns out to be irrelevant. Treat it like a living document — update it when needed.
FAQs
Is the inspection checklist the same for incoming QC, in-process QC, and outgoing QC?
No, it is not the same. The incoming QC inspectors check the components, materials, and subassemblies, not the whole product. The in-process inspectors check both the manufacturing & testing process and the finished products that come out of it. The outgoing QC inspectors only check the finished products.
Who is responsible for creating a quality inspection checklist?
The checklist is usually created by the buyer’s quality team or a third-party inspection service, but it can also be drafted by the supplier’s in-house QA team if there’s alignment on expectations. What matters most is that it reflects the buyer’s product standards and is clear enough for inspectors to follow without room for interpretation.
What happens if a product fails the inspection checklist?
If products don’t meet the checklist requirements — due to defects, incorrect specs, or failed functional tests — the batch can be rejected, reworked, or flagged for further review. The checklist acts as documentation to show what went wrong and helps both supplier and buyer decide on next steps.
Conclusion
Building and using a quality inspection checklist isn’t just an extra task — it’s a practical, high-impact way to protect your product, your brand, and your bottom line.
When done right, it helps prevent costly mistakes, ensures consistency across inspections, and makes collaboration with suppliers or third-party inspectors a lot smoother.
If you’re just starting out, or looking to improve your current checklist, we recommend checking out this guide on how to prepare a QC inspection checklist. It breaks down key steps and considerations that can help you set a solid foundation.
You might also find this simple checklist for quality inspections helpful — it offers a practical format you can adapt to your own needs.
For more insights on quality control, supplier audits, and inspection best practices, browse through the QualityInspection.org blog or explore their full site at qualityinspection.org. There’s a wealth of information there for anyone serious about improving their inspection process.
Good luck as you build and refine your checklist — and more importantly, as you strengthen your overall approach to quality!
Quality Assurance Policy For Importers In China [Webinar]
What is the 80/20 rule when it comes to QC in China? The answer is building a strong quality assurance policy of your own.
In this webinar, we’re going to explore key challenges facing importers from China, and the elements that compose a really solid, effective quality assurance policy.
Improving your quality assurance will help avoid poor quality products from hurting your business. Hit the button below to register to watch the webinar!


